Balancing Form and Function: 10 Practical Artistic Lighting Tips for 2025

Lights, camera, action! Did you know that proper lighting can increase productivity by up to 20%?
But hold on—we’re not just talking about bland office fluorescent s here. We’re diving into the captivating world of artistic lighting, where form meets function in a dazzling dance of illumination.
Whether you’re a budding interior designer or just someone who wants to add a touch of magic to their living space, you’re in for a treat. Get ready to flip the switch on your creativity as we explore 10 practical artistic lighting tips that’ll transform your space from drab to fab!
1. Understanding the Basics of Artistic Lighting
When I first started exploring artistic lighting, I thought it was all about picking the prettiest fixtures. Spoiler alert: it’s way more than that.
Artistic lighting is about blending aesthetics with functionality to enhance the overall vibe of your space. It’s like creating a piece of art that also lights up your life—literally.
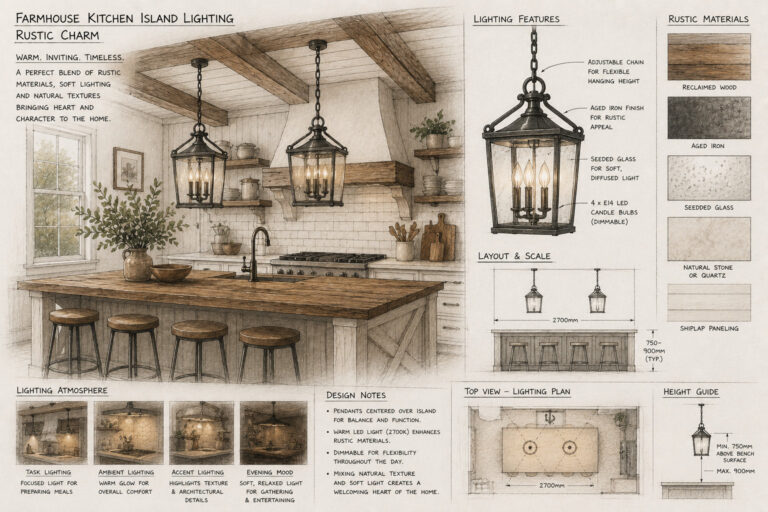
At its core, artistic lighting combines three layers: ambient, task, and accent lighting. Ambient light sets the mood of the room—it’s your base layer, like a canvas. Task lighting focuses on specific areas where you need clarity, like a desk lamp or under-cabinet kitchen lights. And accent lighting? That’s where the magic happens. It highlights features like artwork or architectural details, adding depth and personality.
One thing I’ve learned is that you need to think about the purpose of the space before diving into the design. For example, in my living room, I wanted a warm and inviting vibe, so I used soft, warm tones for the ambient lighting and paired it with a statement pendant light as an accent piece. It turned out way better than I expected.
2. Layering Light for Maximum Impact
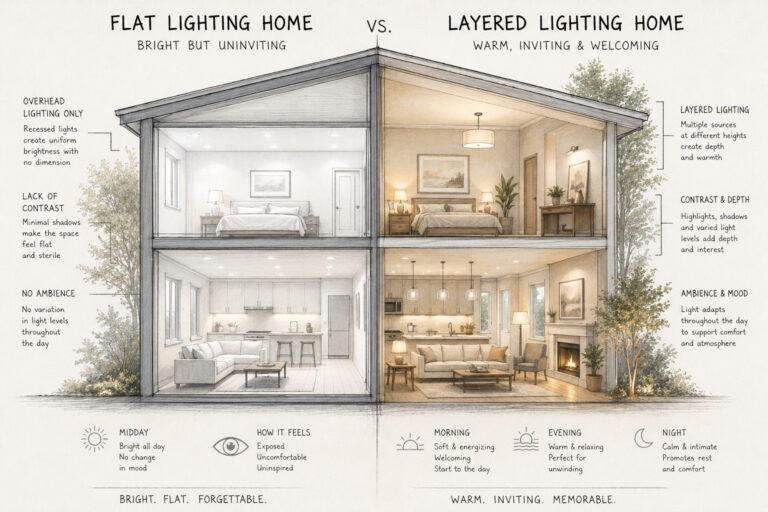
If there’s one artistic lighting tip that’s stuck with me, it’s this: layer your lighting. A single light source isn’t going to cut it if you’re aiming for something visually dynamic. Think of lighting as a recipe—you need the right combination of ingredients to get the perfect result.
Start with ambient lighting to set the overall tone. This could be a chandelier, recessed lights, or even a large floor lamp. Once that’s in place, move on to task lighting for practical areas. For instance, I added under-shelf LEDs in my kitchen, and wow—chopping veggies has never been easier (or looked cooler).
Finally, add accent lighting for drama and interest. In my dining room, I installed a spotlight to highlight a framed piece of art, and it completely changed the feel of the space. Layering light isn’t just about function—it’s about creating depth and guiding the eye.
Pro tip: use dimmer switches wherever possible. They let you control the intensity of each layer, so you can easily shift from bright and energetic to soft and cozy. Once you master layering, your rooms will feel more intentional and alive.
3. Choosing the Right Fixtures for Your Space
Picking the right light fixtures can feel overwhelming—there are so many gorgeous options out there. But here’s the deal: it’s not just about what looks good; it’s about what works for your space. I’ve learned (the hard way) that a fixture can be stunning on its own but totally out of place if it doesn’t fit the room’s scale or style.
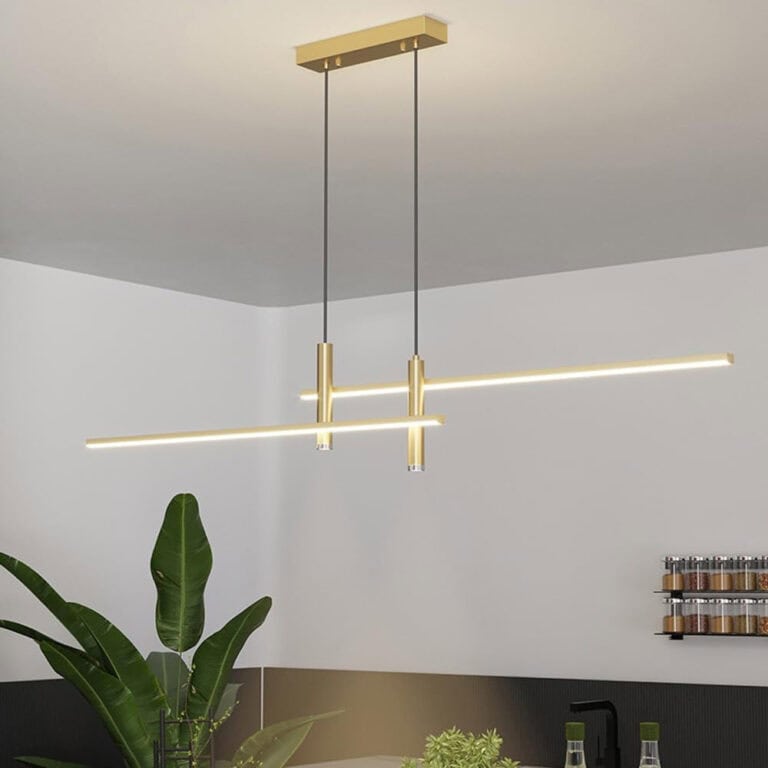
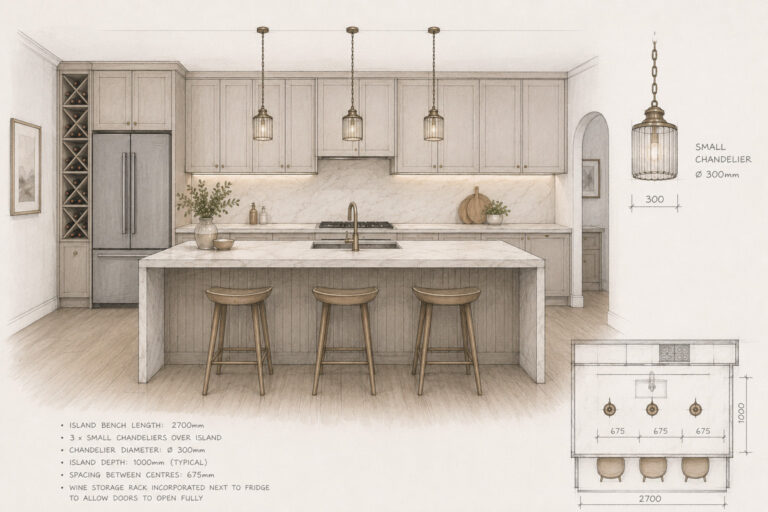
Start by considering the size of the room and the fixture. A small pendant light in a large, high-ceiling room will get lost, while an oversized chandelier in a tiny bedroom might feel overwhelming.
Next, think about the style and how it complements your décor. For example, a sleek, modern sconce works beautifully in a minimalist home, but it might clash in a rustic farmhouse setting.
I have found that mixing styles—like pairing a vintage chandelier with contemporary table lamps—can work wonders if done thoughtfully.
Finally, consider the quality of light the fixture provides. Some fixtures are all about aesthetics but give off terrible lighting. Look for designs that are functional and beautiful. And don’t forget to match the bulb’s color temperature to the vibe you’re going for—warm for cozy spaces, cooler tones for work areas.
4. Playing with Shadows and Contrasts
If you really want to take your lighting game to the next level, start thinking about shadows and contrasts. These elements can add drama, intrigue, and artistic flair to your space. I’ll admit, I was intimidated by this at first—I mean, shadows seemed like something to avoid. But once I started playing with them, I realized they’re just as important as the light itself.
One trick is using fixtures with intricate patterns or cutouts. I added a Moroccan-style pendant light to my entryway, and the way it casts geometric shadows across the walls is absolutely mesmerizing. It’s like having a built-in art installation.
You can also create contrast by layering light and dark areas. For example, I have a spotlight highlighting a piece of art on one wall, while the surrounding space stays softly lit. This contrast draws the eye exactly where I want it to go.
Another technique? Use uplights and downlights strategically. Uplights can emphasize architectural features like beams or arches, while downlights create cozy pools of light. Experiment with angles and placement—it’s amazing how a slight adjustment can completely change the mood.
Shadows and contrasts give your space depth and personality. Don’t be afraid to play around—you might just surprise yourself.
5. Incorporating Natural Light into Your Design
Natural light is the unsung hero of artistic lighting design. It’s free, ever-changing, and absolutely transformative when used well. I didn’t fully appreciate this until I moved into a home with big, north-facing windows here in Australia south facing in the northern hemisphere.
Suddenly, I understood why designers talk so much about harnessing natural light.
The first step is to assess how light moves through your space during the day. In my living room, I noticed how the morning sun hits one corner, so I placed a reading chair and a small table there. That spot has become my favorite little nook.
Use light, sheer curtains to diffuse harsh sunlight or reflective surfaces like mirrors to bounce light into darker areas. I added a large mirror opposite a window in my dining room, and it instantly made the space feel brighter and bigger.
Don’t forget to layer natural and artificial light for seamless transitions. As the sun sets, I use warm-toned table lamps to mimic the soft glow of twilight—it’s a game-changer for evening ambiance.
Natural light isn’t just practical—it’s part of your lighting story. When you embrace its nuances and pair it with thoughtful artificial lighting, your space becomes a living, breathing work of art.
6. Colour Theory in Artistic Lighting
Colour theory plays a huge role in artistic lighting, helping you set the tone, create mood, and enhance the overall aesthetic of a space. When I first started experimenting with lighting design, I underestimated how much color could influence the vibe of a room. Trust me, a poorly chosen hue can make even the most beautiful room feel off.
Warm colors like reds, oranges, and yellows tend to evoke energy and coziness, while cool tones like blues and greens are calming and serene. For example, I once added a soft amber light to my dining room, and it instantly felt more intimate and inviting. In contrast, blue-tinted lights in my bathroom created a spa-like retreat.
Consider using complementary colors for drama. I paired teal wall accents with a coral-colored pendant light, and the contrast was both bold and balanced. For a more harmonious vibe, analogous colors (like blues and purples) can create a soothing flow.Don’t overlook the importance of color temperature in white light. Warm white (around 2700K) feels cozy, while cooler white (4000K and above) is ideal for focus. By incorporating color theory into your lighting design, you can turn a functional space into an artistic masterpiece.
7. Smart Lighting Solutions for Artistic Control
Smart lighting has completely revolutionized how we approach artistic lighting design. With the ability to customize colors, intensity, and even patterns, smart solutions let you take full control of your lighting story. I was skeptical at first, but after installing smart bulbs in my living room, I can’t imagine going back to traditional lighting.
Systems like Philips Hue and LIFX allow you to change the color and brightness of your lights through an app or voice control. I love setting my lights to a warm amber for cozy evenings or switching to a vibrant purple for parties. It’s like having a remote control for your creativity.
One of my favorite features is scheduling. I have my lights set to gradually brighten with soft blues in the morning and fade to warm tones at night, mimicking the natural rhythm of daylight. It’s both functional and atmospheric.
If you’re into tech, explore more advanced options like lighting that syncs with music or movies. I added an LED strip behind my TV that changes color based on what’s on the screen, and it’s made movie nights so much more immersive.
Smart lighting not only enhances your artistic vision but also makes it easier to experiment and adjust on the fly. It’s an investment that pays off in both creativity and convenience.
8. Energy-Efficient Artistic Lighting Techniques
Artistic lighting doesn’t have to come at the expense of sustainability. With energy-efficient techniques and tools, you can create stunning designs while keeping your environmental footprint low—and your wallet happy. I started making these changes in my own home, and the results were both beautiful and budget-friendly.
LEDs are a game-changer for energy efficiency. They use up to 80% less energy than incandescent bulbs and last significantly longer. I swapped all my fixtures to LEDs, including RGB strips for accent lighting, and saw an immediate drop in my energy bills.
Use dimmers to control brightness and save energy. In my living room, I installed dimmers on my overhead lights and table lamps, which not only lets me customize the mood but also reduces energy use when full brightness isn’t needed.
Solar-powered outdoor lights are another great option. I’ve used them to highlight pathways and garden features, and they’re completely powered by the sun—no extra energy costs required.
Finally, consider incorporating motion sensors in less frequently used areas like hallways or entryways. I added a motion-sensor uplight in my hallway, and it only activates when someone passes by, saving energy without compromising on design.
By embracing these techniques, you can achieve artistic lighting that’s as eco-friendly as it is beautiful.
9. DIY Artistic Lighting Projects
DIY lighting projects are a fantastic way to bring your artistic vision to life without breaking the bank. The best part? They let you create something totally unique and personal for your space.
I’ve tackled a few DIY projects myself, and they’re some of my favorite pieces in my home.
One of my easiest (and most satisfying) projects was a rope lamp shade. I wrapped jute rope around an old wire frame, secured it with hot glue, and added a vintage Edison bulb. The result? A rustic-chic light fixture that casts beautiful shadows on the walls.
For a more colorful touch, try making a fabric lantern. I used leftover fabric scraps, paste glue, and a balloon to create a lightweight shade that glows beautifully when lit. You can even mix and match patterns for a playful effect.
If you’re into tech, LED art panels are a fun option. I attached RGB LED strips to a canvas and programmed them to cycle through colors—it’s like having a living piece of art on my wall.
DIY projects are all about experimenting, so don’t be afraid to get creative. Start small, use materials you already have, and let your imagination run wild.
10. Common Artistic Lighting Mistakes to Avoid
Artistic lighting can transform a space, but it’s easy to fall into a few common traps. Trust me, I’ve made my fair share of mistakes—and learned a lot from them.
Mistake 1: Relying on a Single Light Source
A single overhead light often makes a room feel flat and uninviting. I made this mistake in my first apartment, and the space felt more like a storage unit than a home. Layering ambient, task, and accent lighting is key to creating depth and dimension.
Mistake 2: Choosing the Wrong Bulb
Using bulbs with the wrong color temperature can completely change the mood of a room. I once used cool white bulbs in my living room, and it felt like a doctor’s office. Warm white tones are better for cozy spaces, while cool whites work best in task-oriented areas.
Mistake 3: Ignoring Scale and Proportion
A fixture that’s too small or too large for the space can throw off the entire design. I bought a massive chandelier for a small dining room once—it looked ridiculous. Always measure your space and consider the fixture’s size before buying.
Mistake 4: Overdoing the Color
Too many colors can make a space feel chaotic. Stick to one or two complementary hues, and balance them with neutral tones. This keeps the design cohesive and visually appealing.
Avoiding these pitfalls will save you time, money, and frustration, ensuring your artistic lighting looks intentional and polished.
Conclusion
Artistic lighting is more than just functional—it’s an opportunity to express your creativity and transform your home into a dynamic, personalized space. By understanding the basics of color theory, layering light, and choosing the right fixtures, you can create designs that balance form and function effortlessly.
Whether you’re incorporating smart technology for precise control, experimenting with sustainable techniques, or tackling DIY projects, the possibilities are endless. Just remember to avoid common mistakes and let your imagination guide you.
Great lighting isn’t just about illuminating a room—it’s about telling a story. With these artistic lighting tips, you’re ready to craft spaces that inspire, captivate, and truly feel like home.