Cohesive Home Lighting Tips in 2025: How to Create a Cohesive Lighting Story Throughout Your Home:
“Light is the magical ingredient that makes or breaks a space.” – Lesley Myrick
A “lighting story” in home design refers to the intentional use of lighting to create a narrative or evoke specific moods and experiences within a space. It’s about designing a layered and cohesive home lighting scheme that complements the function, aesthetic, and emotional tone of a room, much like a story unfolds with a beginning, middle, and end. Let me share some Cohesive Home Lighting Tips for your Lighting Story.
- Beginning (Ambient Lighting): The foundational layer of lighting sets the tone and overall atmosphere of the space, like the backdrop of a story. It provides general illumination, ensuring the room is functional and welcoming.
- Middle (Task Lighting): This layer focuses on specific areas where activities occur, such as reading, cooking, or working. It adds purpose and clarity to the space, much like the plot thickens in a narrative.
- End (Accent Lighting): This is where the drama and detail come in, highlighting focal points like artwork, architectural features, or textured walls. It adds character and emotional depth, giving the space personality and flair.
When combined, these layers guide the eye, set the mood, and tell a “story” about how the space is meant to feel and function. A well-executed lighting story transforms a home from merely functional to a deeply engaging and visually rich experience using cohesive home lighting tips.
1. Understanding the Basics of a Cohesive Lighting Plan
A solid cohesive home lighting plan starts with mapping out your whole home’s lighting temperature. In my experience, sticking with either warm whites (2700-3000K) or cool whites (3500-4000K) throughout the main living spaces makes everything feel put-together. These days, I always tell my students that creating flow between rooms is just as important as the fixtures themselves.
One game-changing tip? Install dimmers everywhere. Seriously, being able to adjust light levels throughout the day has completely transformed how my spaces feel connected. Plus, it helps manage the transition between natural and artificial light without any jarring changes.
Remember, your cohesive home lighting plan should work like a well-orchestrated symphony – each element playing its part while contributing to the bigger picture. When done right, you shouldn’t even notice the lighting – you’ll just feel that everything works.
2. Assessing Your Home’s Lighting Needs
Here’s a pro tip that changed my whole approach to cohesive home lighting: spend a full day in each room. I mean really spend time there. Notice when you’re squinting or when shadows become an issue. The other day, I realized my “perfect” kitchen lighting was actually terrible for food prep because I hadn’t considered counter shadows.
Remember, proper assessment prevents those costly lighting do-overs. Been there, fixed that!
Let me tell you something – after spending 15 years teaching art and design, plus renovating three homes of my own, I’ve learned that getting your home’s lighting right is like solving a really satisfying puzzle. Trust me, I’ve made my fair share of lighting mistakes (like that time I installed just one overhead light in my home office and ended up with killer headaches from the harsh shadows).
-: Start With Natural Light Assessment
-: Map Out Your Activities
-: Architectural Features Can Matter More Than You Think
-: The Technical Stuff Actually Matters
-: Getting It All to Work Together
Want to avoid my rookie mistakes? Start by living with your natural light for a while before making any major lighting decisions. Trust me, your future self will thank you for taking the time to get this right!
3. Developing Your Lighting Theme
A cohesive home lighting plan needs structure but also flexibility to work well. A cohesive home lighting theme isn’t just about matching fixtures (though I totally made that mistake in my first home!).
Think of your lighting theme as your home’s story. In my house, I went with what I call “modern farmhouse meets cosy library” – mixing industrial-style pendants with warm, vintage-inspired sconces. But here’s the real game-changer I discovered: it’s more about consistent light quality than matching every single fixture.
The secret sauce? Pick your metals and finish types, then stick with them. I learned this after installing a gorgeous bronze pendant in my otherwise brushed nickel kitchen – talk about a rookie move! Now I tell my students to limit themselves to two metal finishes max throughout their home.
Temperature consistency is super important too. Y’all wouldn’t believe the difference it made when I finally switched all my bulbs to the same warm white tone (3000K is my sweet spot). It instantly made my cohesive home lighting plan feel more intentional, even with different fixture styles.
Remember, your theme should work for your lifestyle, not against it!
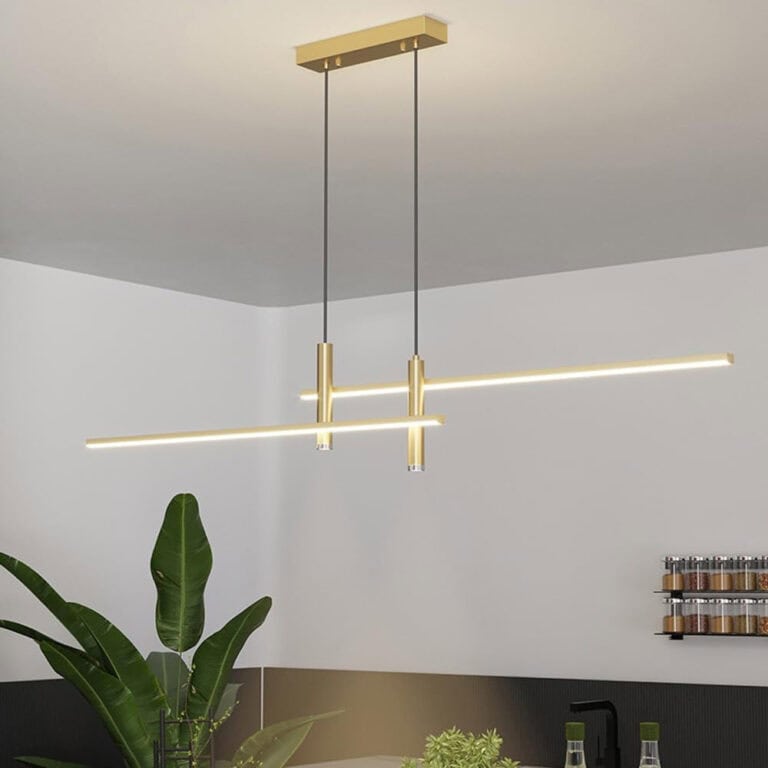
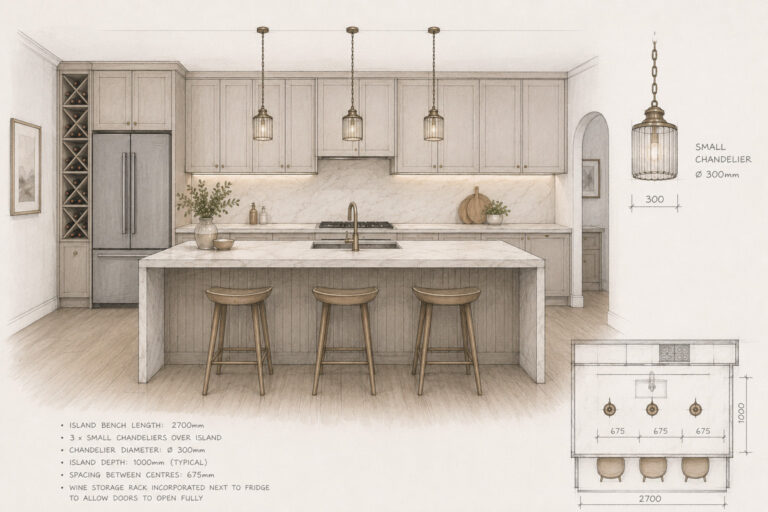
4. Creating Flow with Fixture Selection
Selecting fixtures for cohesive home lighting is like putting together a puzzle where all the pieces need to vibe together.
And boy, did I learn this the hard way! Last year, I installed this super modern chandelier in my traditional dining room, and it stuck out like a sore thumb against my more classic kitchen pendants.
Here’s my tried-and-true approach: start with your main living spaces first. Choose fixtures that share some common DNA – maybe it’s the finish, shape, or overall style.
In my home, I went with black metal fixtures with simple lines throughout the first floor. But here’s the kicker – they don’t match exactly, they just feel related.
One game-changing tip I always share with my clients: pick a signature element and repeat it. For me, it’s cylinder-shaped glass shades. I’ve got them on my kitchen island pendants, in my hallway sconces, and even in my living room floor lamp. Different sizes and heights, but that repeated element creates this amazing sense of flow.
Just remember, fixtures don’t need to be twins – they just need to be cousins! Trust me, this approach to cohesive home lighting makes every room feel connected without being boring.
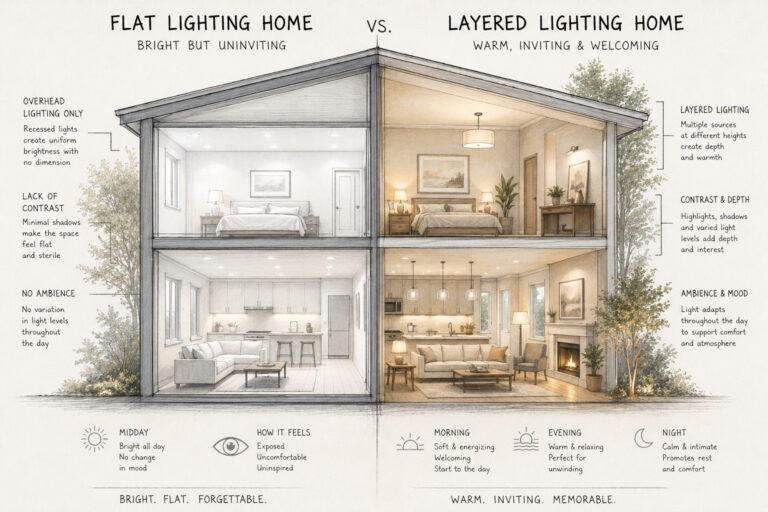
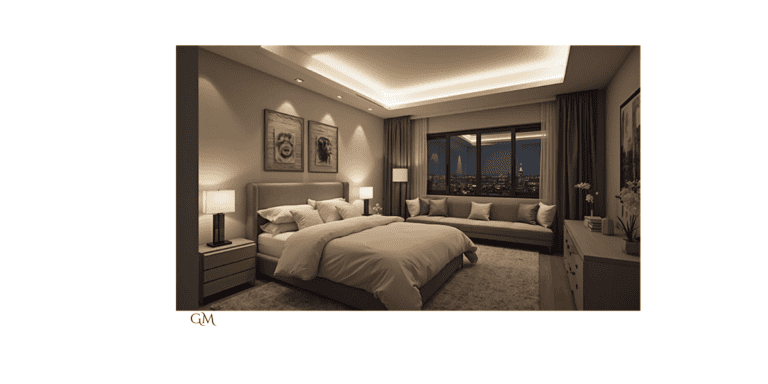
5. Layering Light for Depth and Interest
In my experience, I’ve learned that cohesive home lighting is all about layers, kinda like dressing for unpredictable weather.
You wouldn’t believe the difference proper layering makes. In my living room, I used to have just this big ceiling fan light that made everyone look like they were under interrogation.
Now I’ve got a mix of ambient ceiling lights, wall sconces for that mid-level glow, and strategically placed table lamps. The transformation is like night and day – pun totally intended!
Here’s my foolproof formula: start with your ambient lighting (that’s your overall room brightness), add task lighting for specific activities (like that perfect reading spot I created in my corner nook), and finish with accent lighting to highlight cool architectural features or artwork.
Pro tip: put everything on separate switches or dimmers. Trust me on this one – I learned the hard way that flexibility is key.
Remember, good cohesive home lighting layers should work together like a well-orchestrated symphony, not compete like a battle of the bands!
6. The Art of Transition: Connecting Spaces with Light
I’ve finally cracked the code on smooth lighting transitions for cohesive home lighting. It’s like conducting an orchestra – every space needs to flow into the next.
I learned this lesson the hard way in my own house. The bright kitchen used to dump into a cave-like hallway, which gave everyone serious vertigo! These days, I use what I call the “step-down method” – each connecting space is only slightly different in brightness from the last.
In my hallway makeover, I installed these gorgeous sconces that bridge the gap between my kitchen’s task lighting and the softer living room ambiance.
Here’s my golden rule: no more than a 50% change in light levels between connected spaces. I also discovered that using similar fixture finishes in transitional areas makes everything feel intentionally connected.
And don’t forget about those in-between spaces like hallways and landings – they’re the unsung heroes of cohesive home lighting!
7. Enhancing Your Home’s Architecture with Light
Let me share something – light can be your architecture’s best friend or its worst enemy. And trust me, before I figured out cohesive home lighting, I made some choices that did my beautiful crown moulding zero favours!
The game-changer came when I started thinking of light as a highlighter pen for my home’s best features. Now I use upward-facing sconces to show off my high ceilings, and cove lighting to emphasize that gorgeous original moulding I almost ignored. But here’s the catch – you’ve got to be strategic about it.
My tip: identify your room’s architectural MVP (most valuable piece) and light it first. Everything else should play a supporting role.
In my entryway, I used adjustable recessed lights to gently wash the walls, drawing attention to the beautiful staircase without creating harsh shadows. Remember, good architectural lighting shouldn’t scream for attention – it should whisper!
8. Outdoor Lighting: Extending Your Story Beyond the Interior
I’ve seen how some people often treat outdoor lighting, like it’s totally separate from their cohesive home lighting plan.
Big mistake! I discovered this myself when my beautifully lit living room looked like it was floating in a black hole at night.
Here’s what transformed my approach: think of your windows as two-way mirrors. During the day, they bring light in, but at night, they should frame gorgeous lighting vignettes.
I created “light layers” in my backyard – up lighting for my maple tree, pathway lights that match my interior’s bronze theme, and a soft wash of light on the back porch that echoes my indoor ambient lighting.
Pro tip from someone who learned the hard way: your outdoor lighting temperature should match your interior lights!
When I finally switched my harsh blue-white security light to a warm white that matched my indoor lighting, everything suddenly felt connected.
Now my cohesive home lighting plan flows seamlessly from inside to out.
9. The Role of Natural Light in Your Lighting Story
Understanding natural light changed my whole approach to cohesive home lighting. After years of teaching about artificial lighting, I had this lightbulb moment (pun intended!) about working with Mother Nature instead of against her.
I spent a whole week tracking sunlight patterns in my home – something I now tell all my students to do.
Found out my living room gets amazing morning light but turns into a cave by 3 PM. Instead of fighting this pattern, I created a flexible lighting scheme that fills in when natural light fades.
Installing light sensors was a game-changer – they automatically adjust my artificial lighting throughout the day.
The secret sauce? Layer your artificial lighting to complement natural light patterns, not compete with them. And remember, those gorgeous rays of sunshine should always be the star of your lighting show during daylight hours!
10. Colour and Lighting: Creating Harmony and Contrast
Let me tell you about my biggest “oops” moment in cohesive home lighting – installing cool white lights in my warm yellow kitchen. Talk about a colour clash! After knowing colour theory for years, you’d think I’d know better, but sometimes we learn best from our mistakes.
The game-changer came when I started thinking about light as another layer of colour. These days, I use this simple trick: hold up paint samples under different light temperatures.
You wouldn’t believe how different that “perfect” gray looks under 2700K versus 4000K bulbs! In my living room, I finally nailed the cosy vibe by matching my warm-toned walls with 3000K LED lights.
Here’s my golden rule for cohesive home lighting: stick to one temperature family per open space. And don’t forget about your lightbulbs’ colour rendering index (CRI) – anything less than 90 CRI won’t do your wall colour any favours. Trust me, I learned that one the expensive way!
11. Smart Technology in Cohesive Home Lighting Design
I was totally intimidated by smart lighting at first. But let me tell you, incorporating smart features into my cohesive home lighting plan was a total game-changer.
Started small with just my living room, programming simple scenes for different times of day. Now my whole house runs on what my kids call “autopilot perfection.”
Morning prep? My lights gradually brighten like sunrise. Movie night? One button dims everything just right. The real breakthrough came with motion sensors in my hallways – no more fumbling for switches!
Pro tip: don’t go all-in at once like I did initially. Pick one area, master it, then expand. And always, always have a manual backup. Sometimes old-school switches are still the way to go!
12. Troubleshooting Common Lighting Challenges
I’ve hit every lighting snag imaginable in my quest for perfect cohesive home lighting. Let me share my top fixes for the most common headaches.
Dark corners driving you nuts? Been there! Instead of blasting them with spotlights (my first mistake), try bouncing light off walls with up lighting.
Got glare on your TV? I solved this by switching to indirect lighting and moving my sconces to the side walls.
And those annoying shadows under kitchen cabinets? Under-cabinet lighting strips changed my meal prep game completely.
Remember this lifesaver: before making any major changes, test your lighting plan with portable lamps. This little trick has saved me from so many expensive mistakes in achieving my cohesive home lighting goals!
You know, creating a cohesive home lighting story isn’t rocket science, but it sure felt like it when I first started.
I remember standing in my living room surrounded by different light fixtures, totally overwhelmed by all the choices.
But here’s the thing – once you grasp the basic principles we’ve covered, it all starts clicking into place
The secret sauce to cohesive home lighting really boils down to three key things I’ve learned through trial and error.
First, stick with a consistent colour temperature throughout your space – trust me, mixing warm and cool lights is a rookie mistake I made years ago, and my living room looked like a weird mix between a cosy cabin and a hospital room!
Second, layer your lighting types (ambient, task, and accent) in every room, but keep the style consistent.
And third, don’t forget about dimmers – they’re total game-changers for creating different moods while maintaining that cohesive feel.
Remember, your home’s lighting story is unique to you, but following these principles will give you that put-together look we’re all after.
Start with one room if you’re feeling overwhelmed – that’s what I tell my friends who come to me for lighting advice. Take your time, plan it out, and don’t be afraid to adjust things as you go.
I’ve seen so many lighting transformations over the years, and let me tell you – the satisfaction of nailing your home’s lighting design is totally worth the effort. Now get out there and start creating your own lighting story!
And if you need help you can contact me Here.